Project publishing
This section explains process of publishing QGIS map project. It is assumed that QGIS Desktop together with Gisquick plugin is installed on the user machine.
It is also assumed that Gisquick platform is running on the publication server. Such server can be run on your own hardware or in cloud services, see Deployment of server application in Docker containers section for details.
Tip
 Gisquick provides ready-to-use demo publication server
available at https://projects.gisquick.org, freely available for
experiments and testing.
Gisquick provides ready-to-use demo publication server
available at https://projects.gisquick.org, freely available for
experiments and testing.
QGIS project dedicated for publishing is prepared in the standard way. Map layers can be combined from various data sources as flat files (Esri Shapefile, GML), file-based databases (SQLite, SpatiaLite), server-client databases (PostGIS), or OGC Web Services (WMS, WFS, WCS).
Before publishing project using Gisquick plugin, the project must be saved.
Important
 When using flat files or file-based databases as
data stores it is recommended to save all the files (data and QGIS
project) in the same directory. QGIS project must be set up to use
relative paths (see Project Properties).
When using flat files or file-based databases as
data stores it is recommended to save all the files (data and QGIS
project) in the same directory. QGIS project must be set up to use
relative paths (see Project Properties).
When using any kind of authentication (databases, web services) it must be ensured that server used for publishing will have access rights to such data sources.
Publishing QGIS project will be demonstrated on Prague sample
project downloadable as zip file. At
first, sample prague.qgs QGIS project is open in QGIS
Desktop. Before doing any changes the project will be published as it
is.
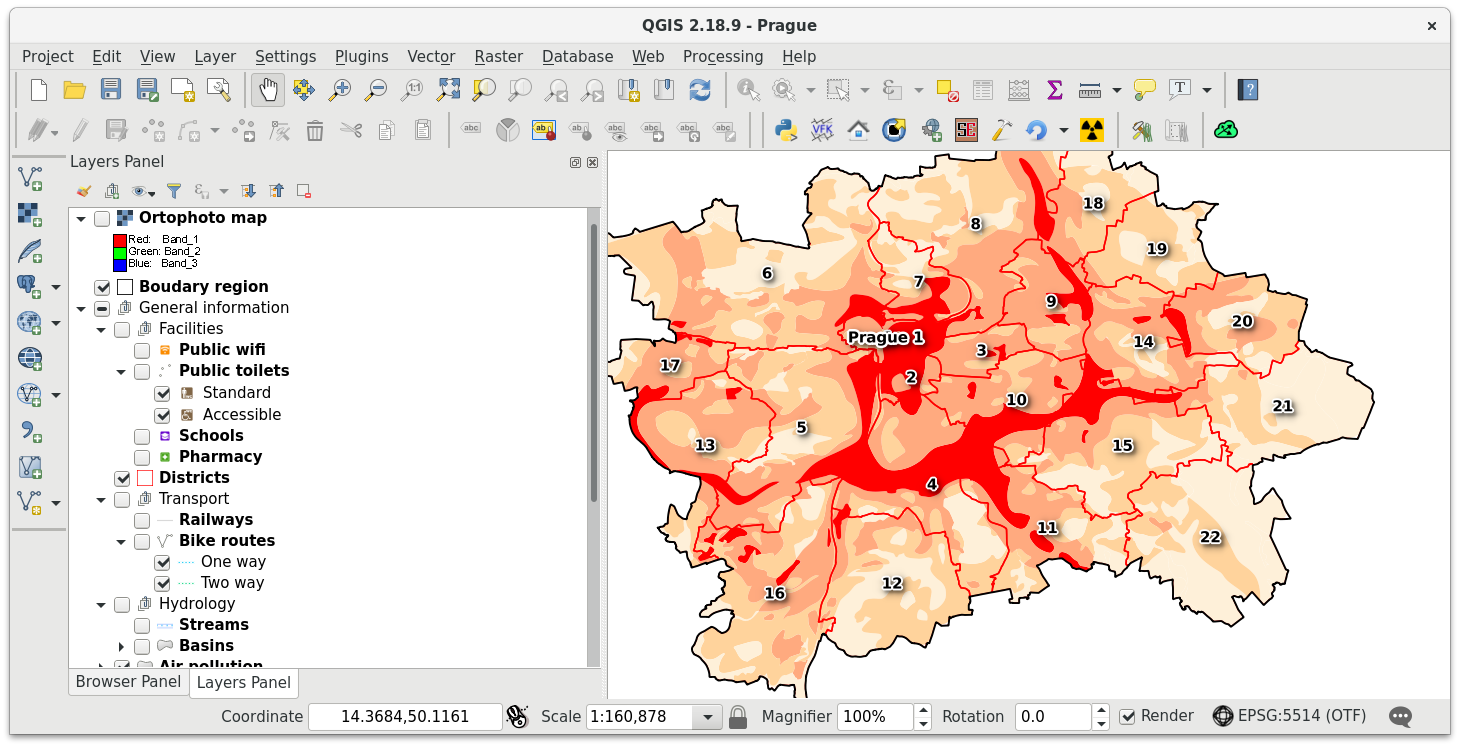
Figure 1: Prague sample project loaded in QGIS.
Publication process is started by Gisquick QGIS plugin
![]() . Plugin is designed as a wizard to simplify publishing
process as much as possible.
. Plugin is designed as a wizard to simplify publishing
process as much as possible.
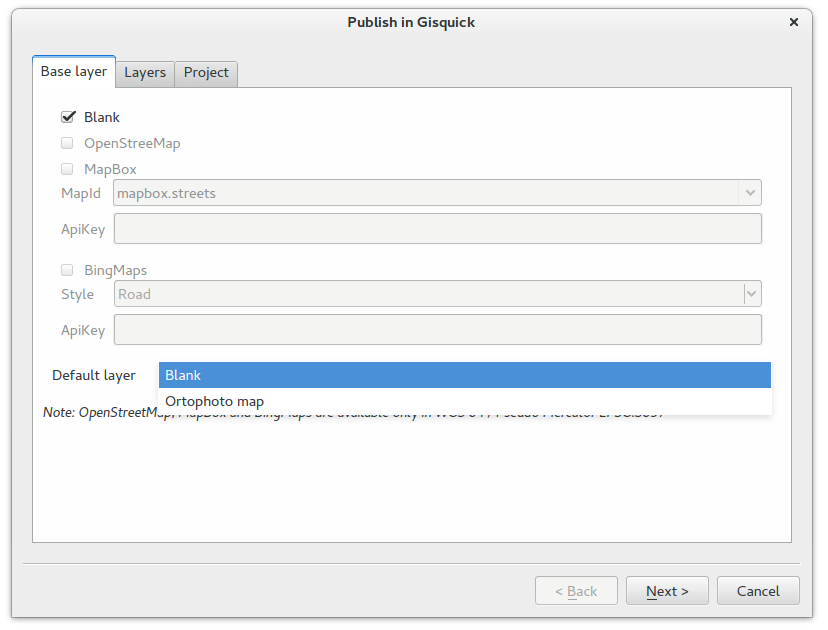
First page of the wizard allows defining basic settings for publishing:
base layers,
overlay layers, and
basic project metadata

By base layers are meant typically WMS layers provided by QGIS
project. Base layer sub-page also allows adding base layers provided by
external services like OpenStreetMap, MapBox or Bing.
Important
External base layers are available only when QGIS
project is using WGS84 Pseudo Mercator projection (EPSG:3857).
Here also default base layer can be defined, see figure below.
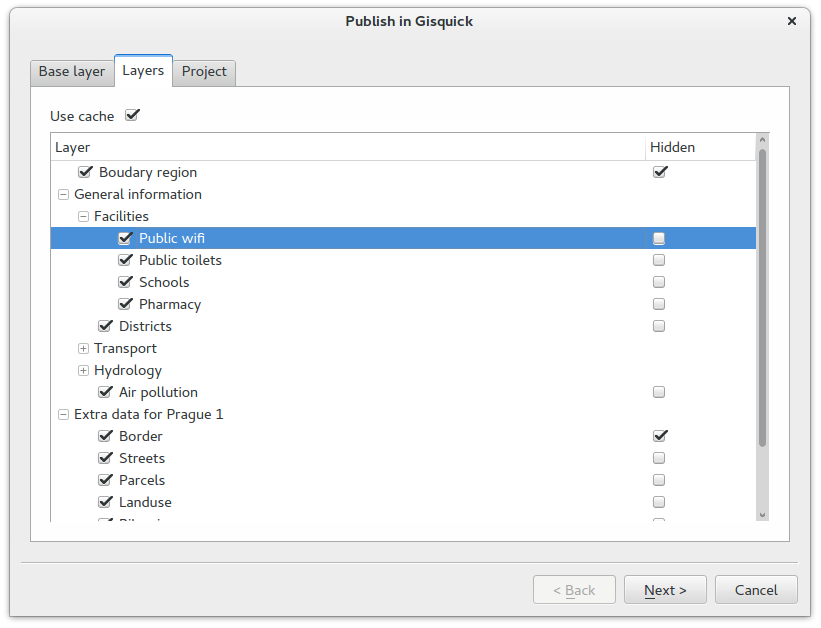
In the second Layers sub-page is controlled, simply by check
boxes, which map layers will be published. It’s also possible to
publish layer as hidden (ie. not shown in Overlay layers tab, see
User Interface section). Top-left checkbox Use cache
controls usage of QGIS Server map cache. By default, map tiles are
cached by QGIS server and re-used when possible.
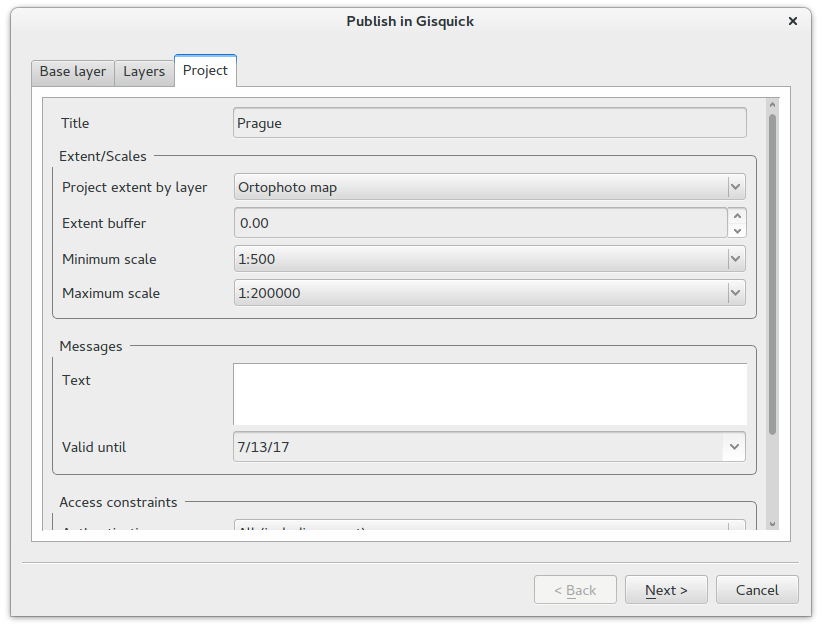
The last Project sub-page allows defining basic project metadata
like title, extent, min/max scales, info message, access constraints,
etc.
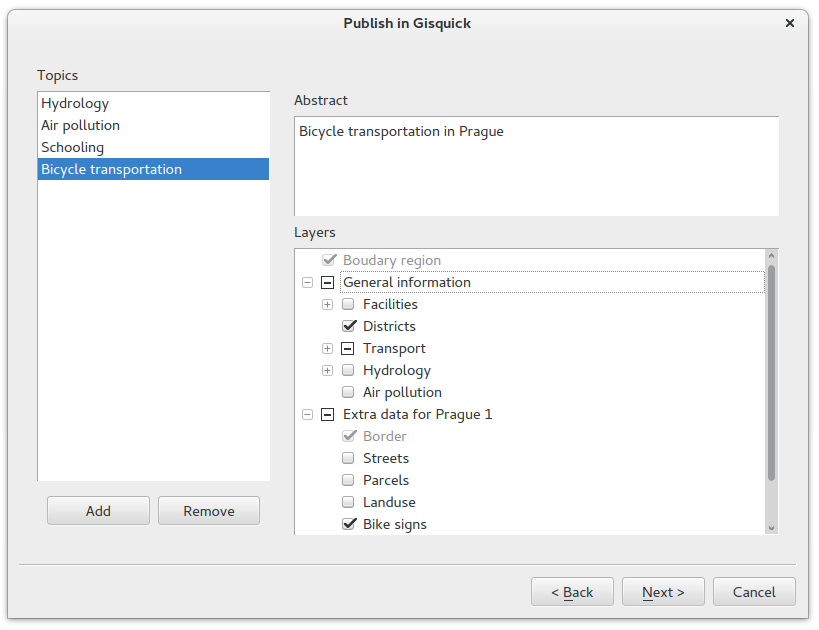
In the following page topics can be defined. By topic it’s meant
group of thematically-related overlay layers. Topics can be easily
switched in Topics tab of Gisquick UI, see
User Interface section. Layers which
should be part of defined topic are simply checked. Topics can be
added or removed by buttons located in bottom-left part of the
dialog. Each topic has defined short description (abstract) which is
shown by Gisquick UI.
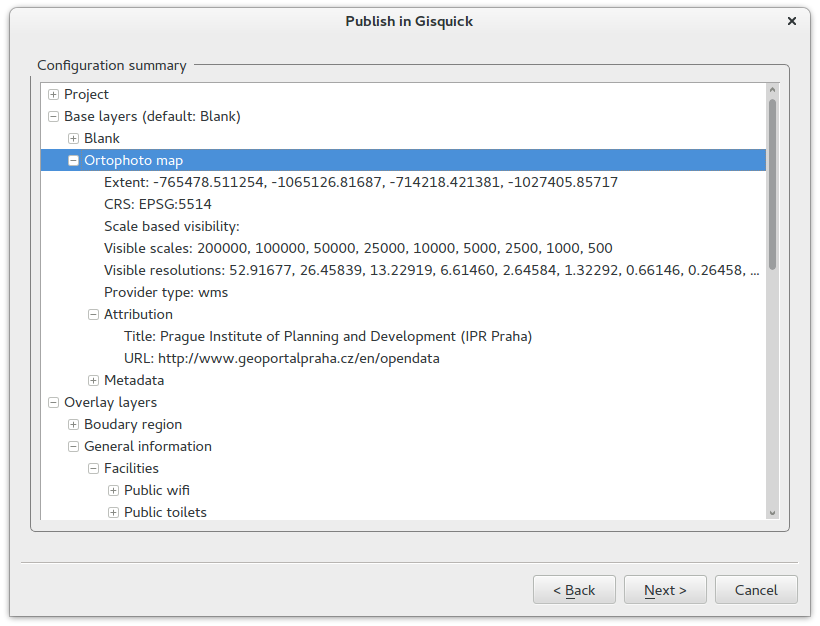
Last but one page shows read-only configuration summary. It’s last
chance to go back by Back button and change publication settings.
On the last page are displayed files which needs to transferred to the
Gisquick publication server. The result of publication process are two
generated files: timestamped QGIS project (.qgs) and metafile
(.meta). These files together with project data (see Data
sources) must be transferred to the publication server.

When Publish button is pressed, unique project file name with
timestamp together with its metafile are created. By default,
timestamped files are created in the same directory as original QGIS
project. Optionally the destination directory can be changed by
Change button. In this case data source files are also copied to
the newly defined directory.
The published project together with data can be optionally zipped into
archive, which can be easily uploaded to the publication server, see
Create project zip file for upload option.
Transferring project to publication server
Publication process is finished by transferring project to the publication server. The procedure will be explained on demo publication server (https://projects.gisquick.org).
Note
 The publication procedure can differ when running own
Gisquick instance.
The publication procedure can differ when running own
Gisquick instance.
First of all a new user account must be created on publication server. This can be done easily by filling registration form available at https://projects.gisquick.org/accounts/register/.

Figure 9: Registration form for creating a new user account.
After pressing CREATE ACCOUNT button an confirmation mail should
be send to given e-mail address.

Figure 10: Completation of registration process will be done by pressing
ACTIVATE ACCOUNT button.
Afterwards a new user is notified about successfull singing-in.

Figure 11: A new user account has been successfully created.
After clicking on CONTINUE button a new user will be redicted to
the publication server welcome screen.

Figure 12: Gisquick demo welcome screen.
The user can log-in using credentials (user name and password). After log-in Gisquick loads an empty project.
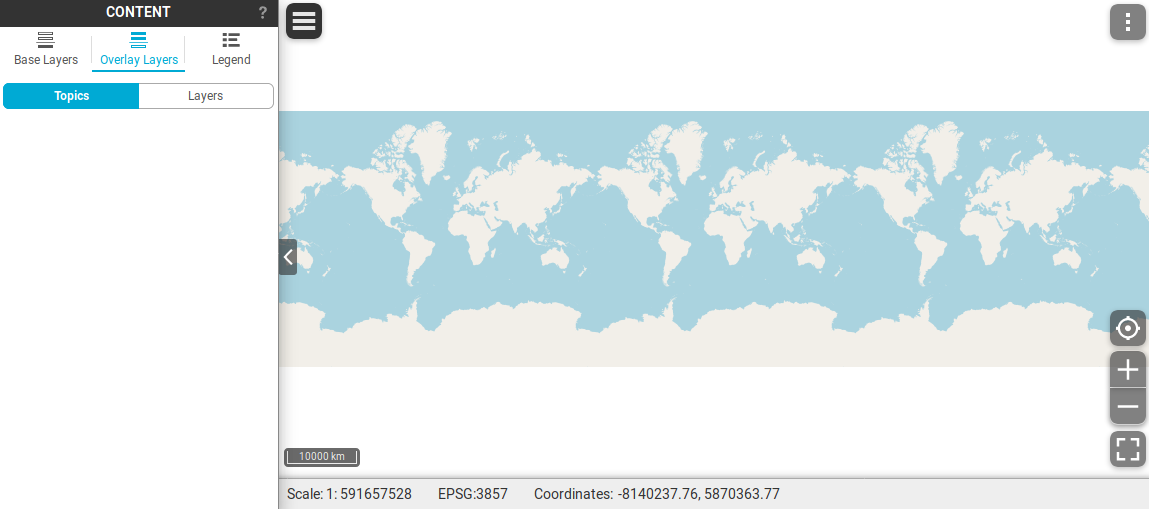
Figure 13: Empty Gisquick project loaded by default.
In the next step the user can upload prepared project zip file created
by Gisquick plugin as described in section above. In the user menu go
to My profile (see User profile page
for details). Go to Upload project, enter project zip file and
upload the file using Upload button.

Figure 14: Upload project zip file.
After successfull upload go to My Projects and find your first
published project.

Figure 15: List of user published projects.
Click on it’s name and enjoy Gisquick!
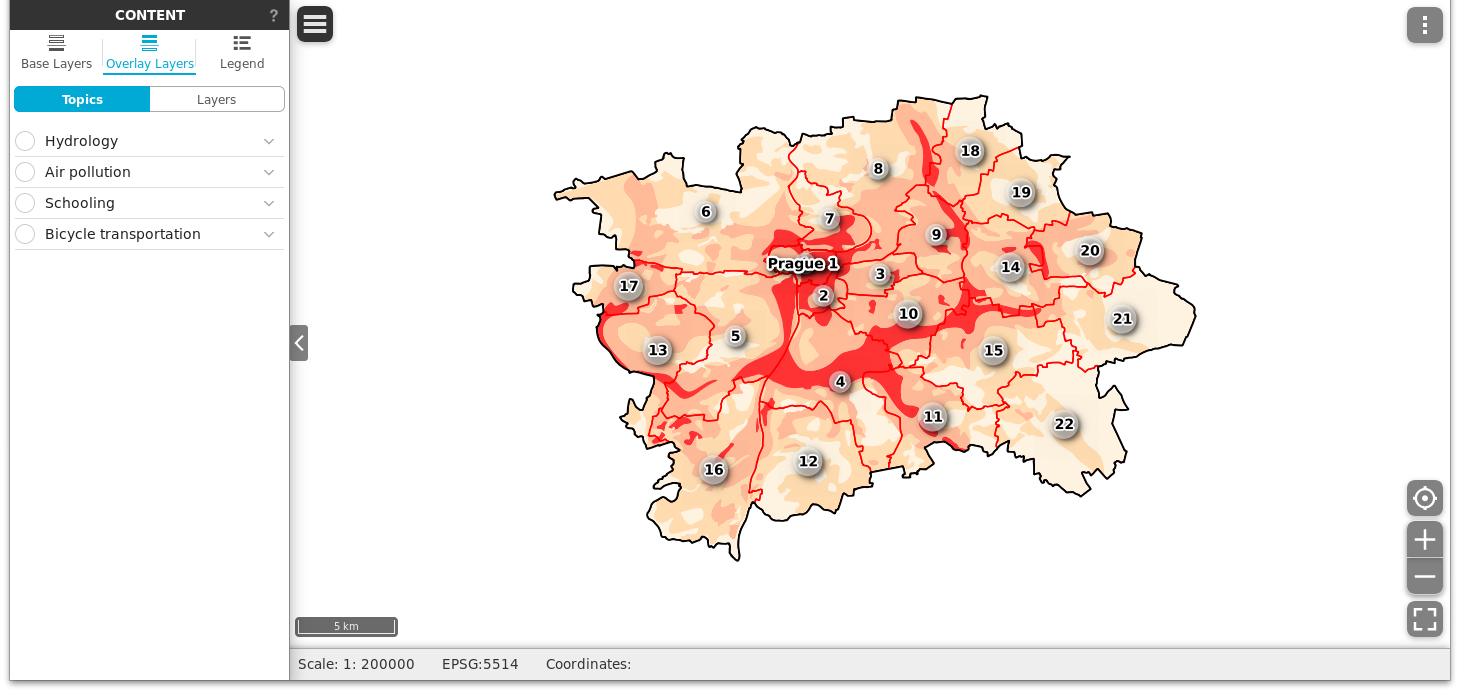
Figure 16: QGIS project published with Gisquick.
Notes for advanced users running testing environment
Uploading step can be skipped when running publication server in
testing enviromment. Publication directory is defined by
docker-compose.yml configuration file. In the presented
example publication directory is located
in Gisquick source tree docker/_data/publish.

Figure 17: Publish directory provided by Docker containers.
Projects in the publish directory are split into
sub-directories corresponding registered users, see
User management section.

Figure 18: Published project separated into user directories.
Important
When user directory is not available in
publish directory it’s necessary to create it.
Then published QGIS project (including timestamped files) with all
associated data can be copied into user publish directory,
eg. docker/_data/publish/user1 directory located on the
publication server. In our example, the project will be copied into
docker/_data/publish/user1/prague directory.
Published project is possible to access by URL formed by server name (https://localhost in the case of virtual server), user name, project directory and QGIS project file name, see URL below.
https://localhost?PROJECT=<user-name>/<project-directory-name>/<qgs-file-name>
As the final step, open web browser and launch published project in Gisquick interface by entering URL, in our case eg. https://localhost?PROJECT=user1/prague/prague.qgs.
You will see welcome screen with possibility to enter credential but
for now, you can just Continue as guest.

Figure 19: Gisquick welcome screen.
Advanced topics
Table templates
Todo
To be added.