Setting up the project
This part of the documentation describes the process of setting up a project in the Gisquick web interface. The procedure consists of a total of seven following steps/sections, General, Files, Map, Layers, Topics, Permissions and Update. Appropriate project settings greatly affect the appearance and functionality of the resulting web map.
Before the actual setup, it is necessary to have the QGIS project uploaded to the Gisquick server, for more information check Before publishing and Publishing.
How to access project settings check Profile page.
Keep in mind that Gisquick may ignore some settings made in the project in QGIS, so the user is advised to check these settings before publishing on Gisquick (e.g. layer visibility or attribute table formatting).
General
In the General section, the user can check summary information about the project. These are list of layers, their queryability, CRS, provider, source or information regarding WFS.
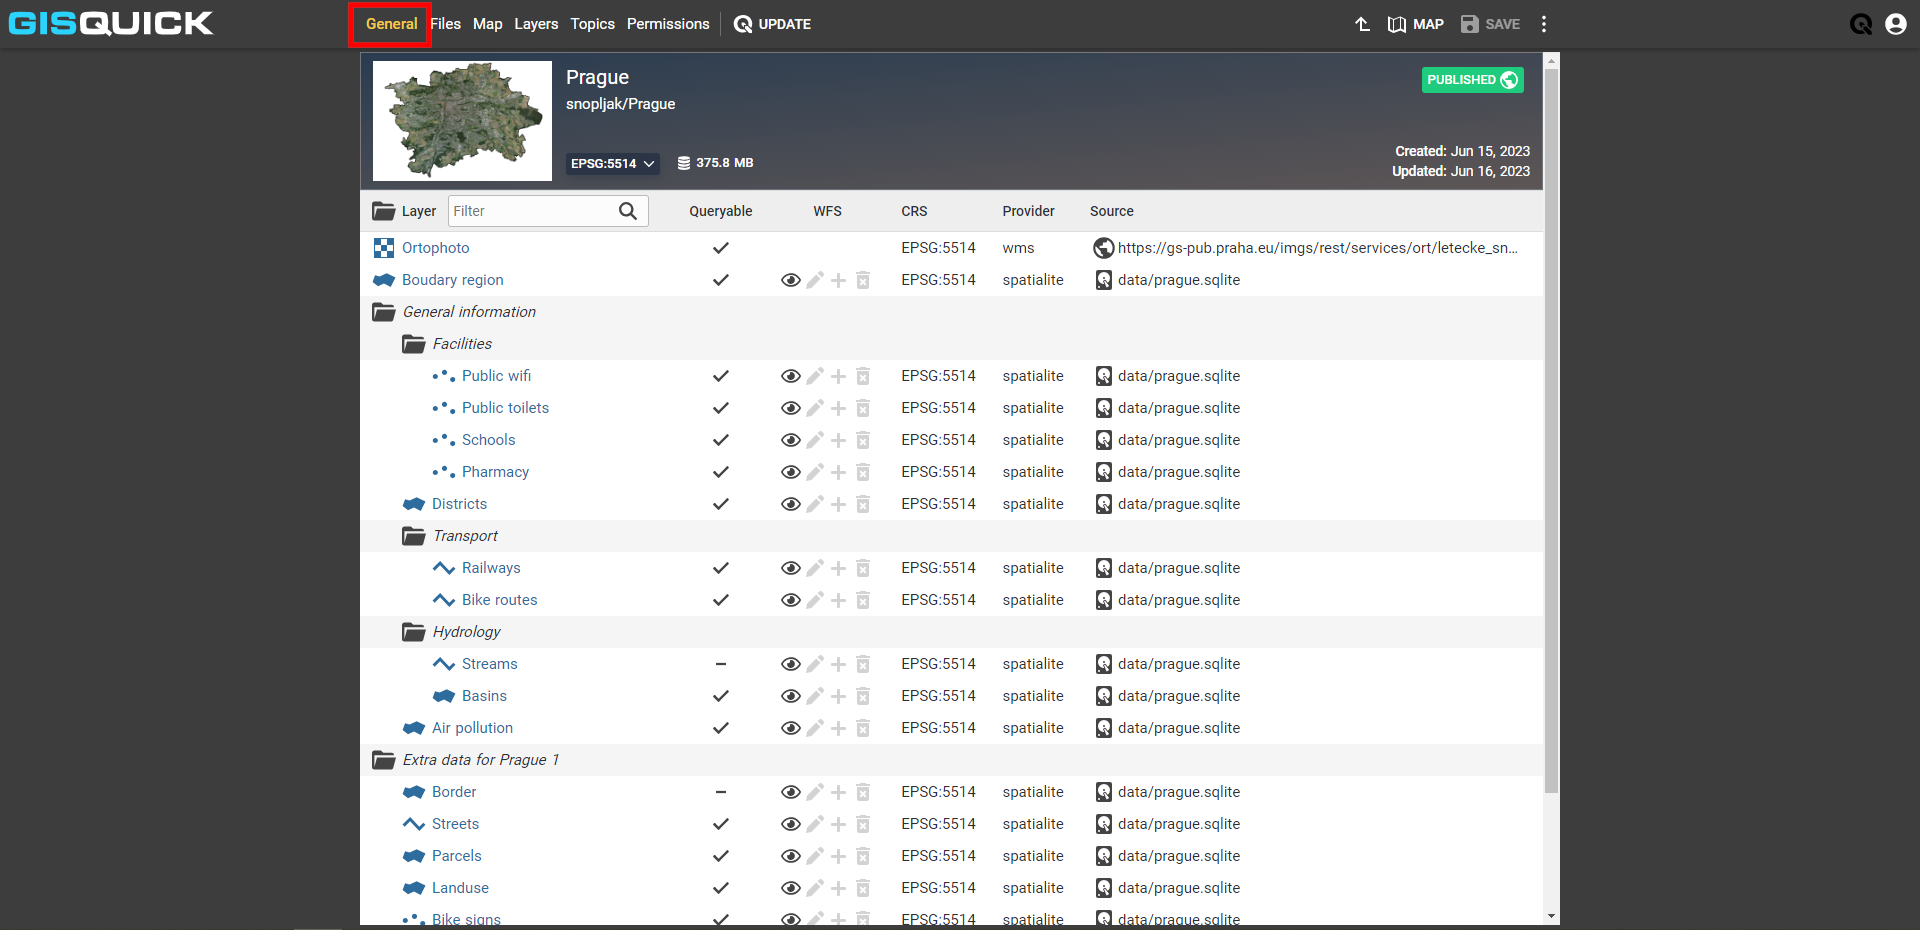
All changes made in these settings can be saved by using the SAVE button
in the top-right corner. It is not necessary to save changes in each tab separately.
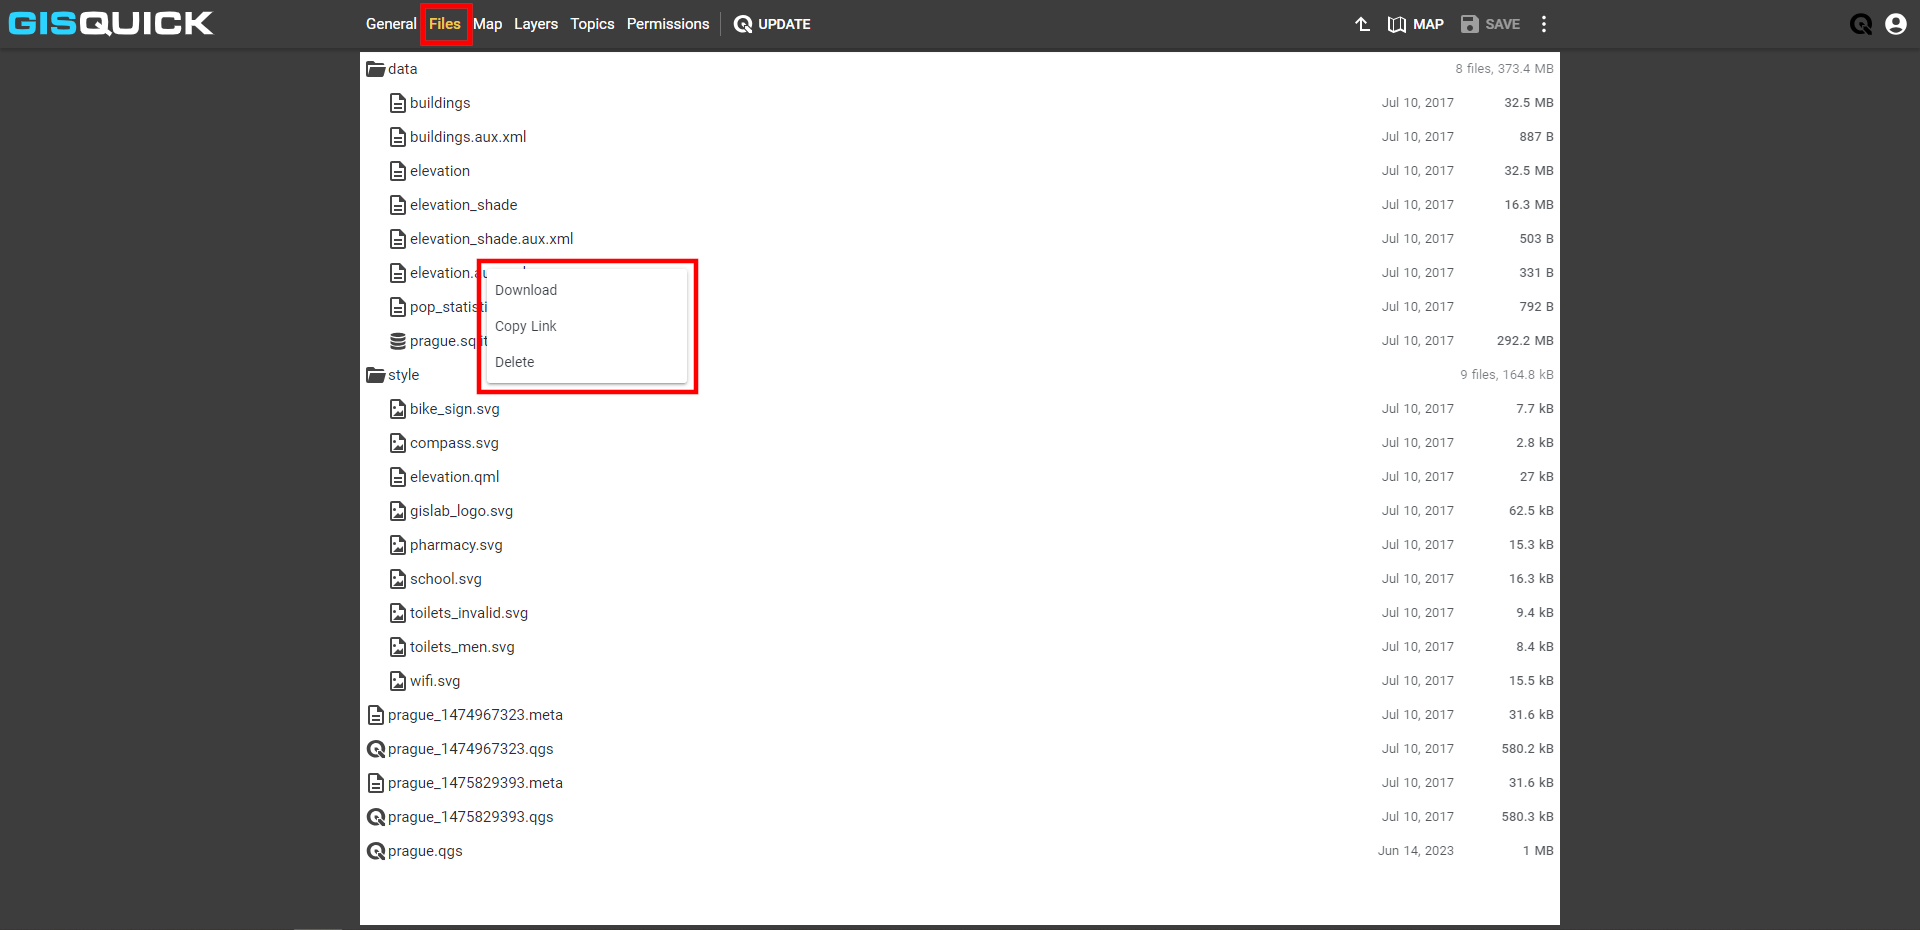
Files
The user is able to view all files uploaded to the server within the project in the Files section. Using the right-click on specific file, it is possible to download it, save the link or delete it.
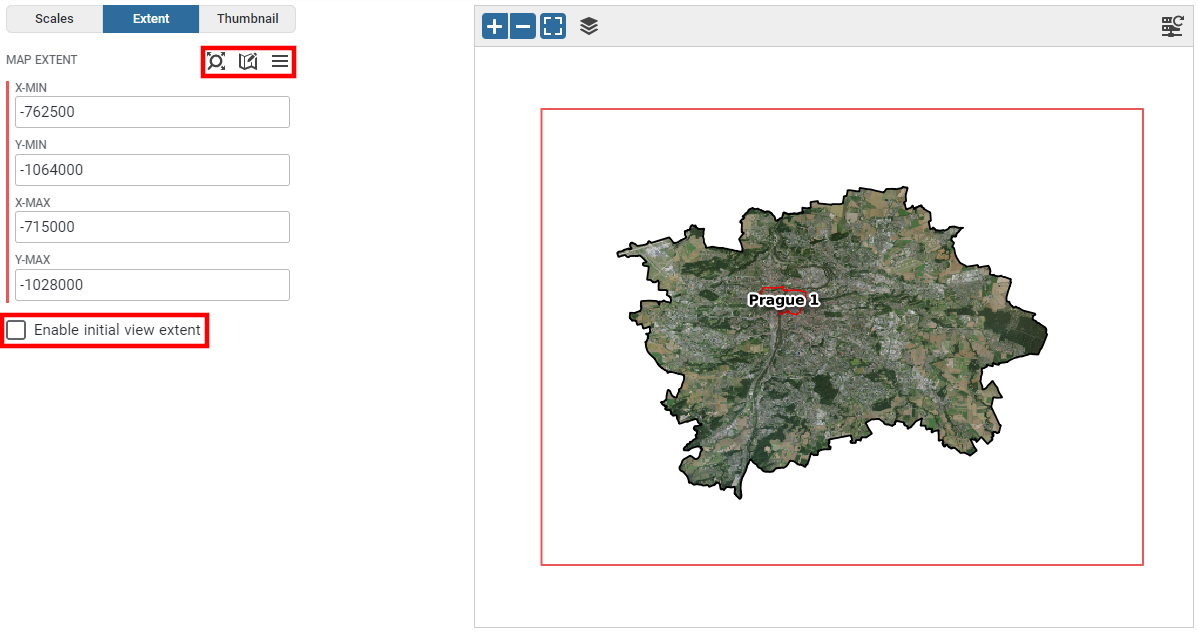
Map
In the Map section, user defines scale for each zoom depth, extent and thumbnail.
Scales settings enables to define depths of zoom. By clicking on ADD button, user adds new scale, with REMOVE button marked scale will be removed. Double-click on particular scale allows to redefine it.

Extent can be defined in three ways:
by entering values of x-min, y-min, x-max and y-max
by moving extent boundary while holding Shift key (accessed by
 )
)by taking over from defined layer (accessed by
 )
)
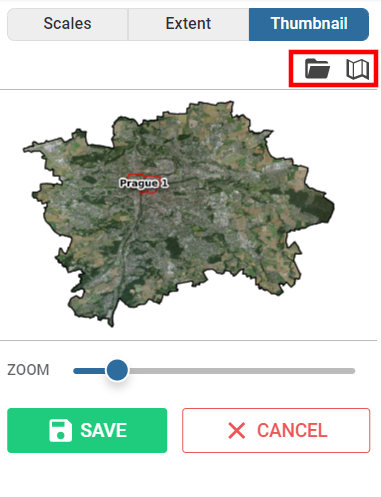
The Project Thumbnail is a useful tool when it comes to orientation among other projects on the profile page. Two methods are available for setting the thumbnail:
uploading from a file (accessed by
 )
)defining the extent and layer to appear on the thumbnail (accessed by
 )
)
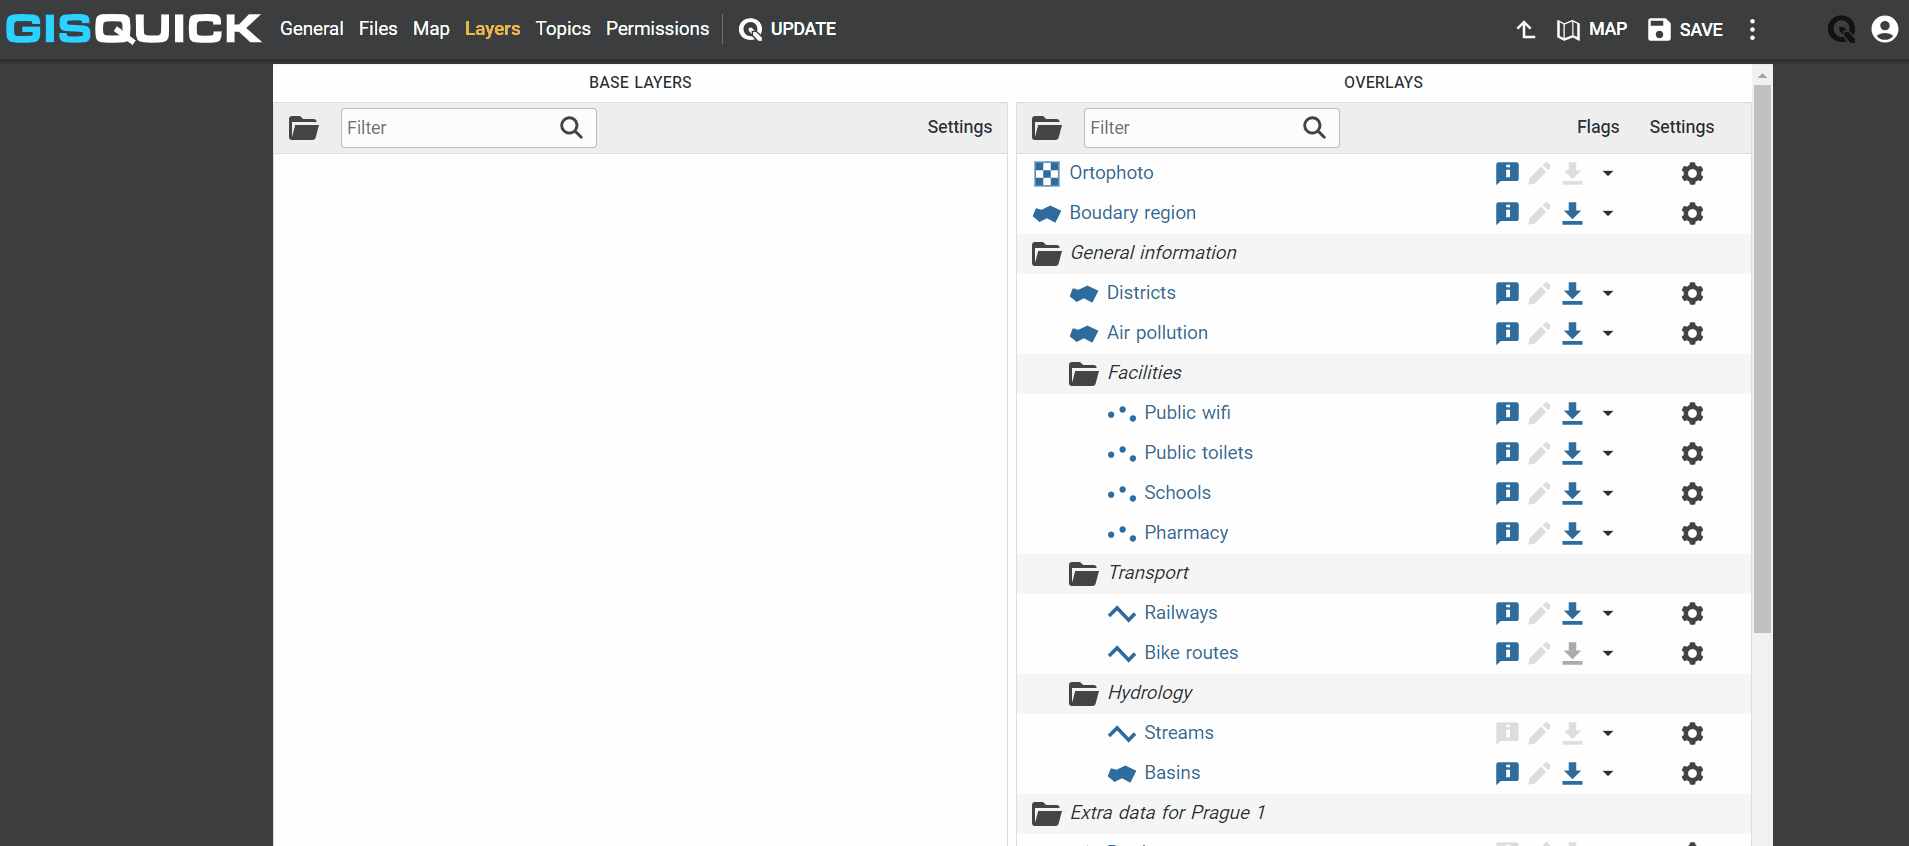
Layers
Within the Layers section, users are granted the ability to manage layers. With a vast selection of options, users can tailor layers to their exact needs.
Base layers on the left half of the screen can be defined by dragging and dropping an arbitrary layer from the right half (Overlays). The behavior of these layers in the web map is described in Content management.
Flags, accessed by  or in settings
  :
:
Excluded layers are not in the layer’s content tab, neither in the map.
Hidden layers are not shown in the layer’s content tab, but they are in the map.
Renderless layers are shown in the layer’s content tab, but are not in the map.
Queryable enable to display attribute table.
Editable enable editing of layer.
Exportable enable to download attribute table. At the same time have to be Quaryable.
Layer Settings, accessed by , enables:
Preview of basic layer’s metadata
Formatting attribute data
Change exportability of attribute data
Customize appearance of layer’s info panel via Vue.js component
Flags
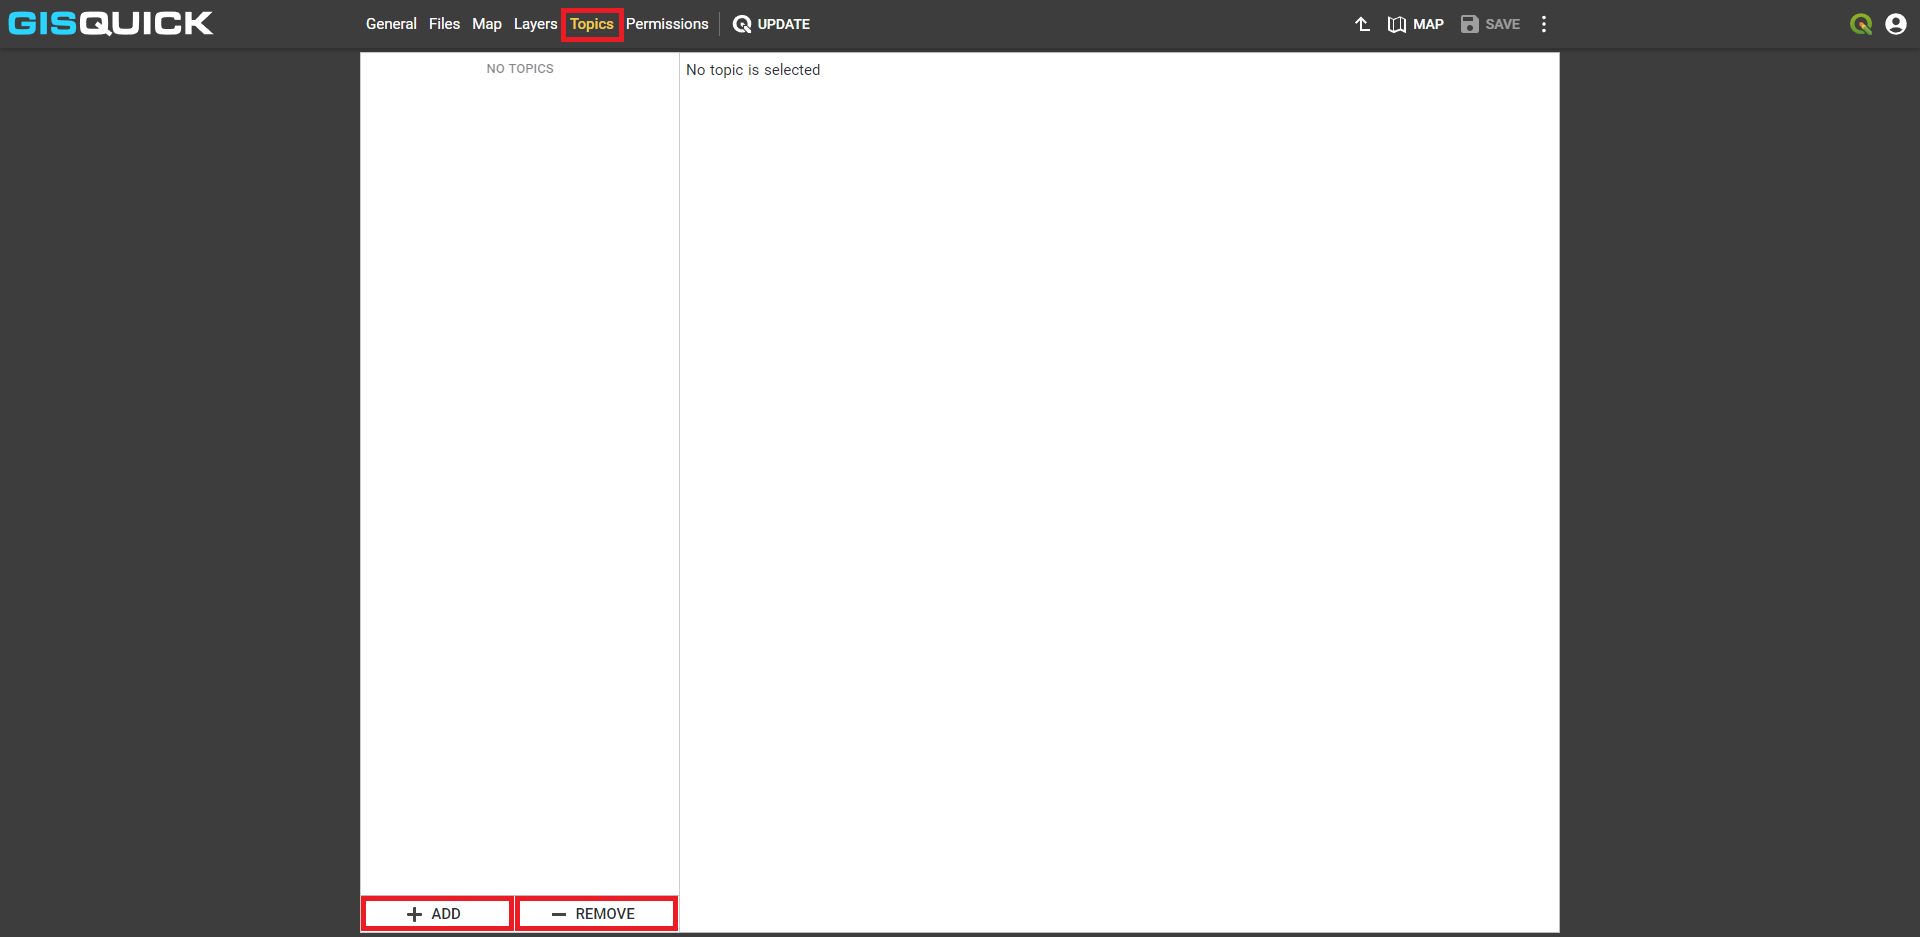
Topics
The Topics section is used to group layers that are in the project.
Layers can be grouped (e. g. based on their similar theme) already in QGIS, or
the topics (groups of layers) can be created here. A project may or may not have Topics,
the decision is up to the user. A Topic can also contain only a single layer.
If Topics are created, it will affect the appearance of the Content management
widget in the published web map. Topics tab is located next to the Layers tab in the user interface.
A Topic can be easily added or removed using ADD or REMOVE buttons. After clicking on
ADD button, the user can edit Topic’s name and description and select the layers wanted in the Topic.
Note
The Description of a Topic is called Abstract in the Content management widget of the web map.
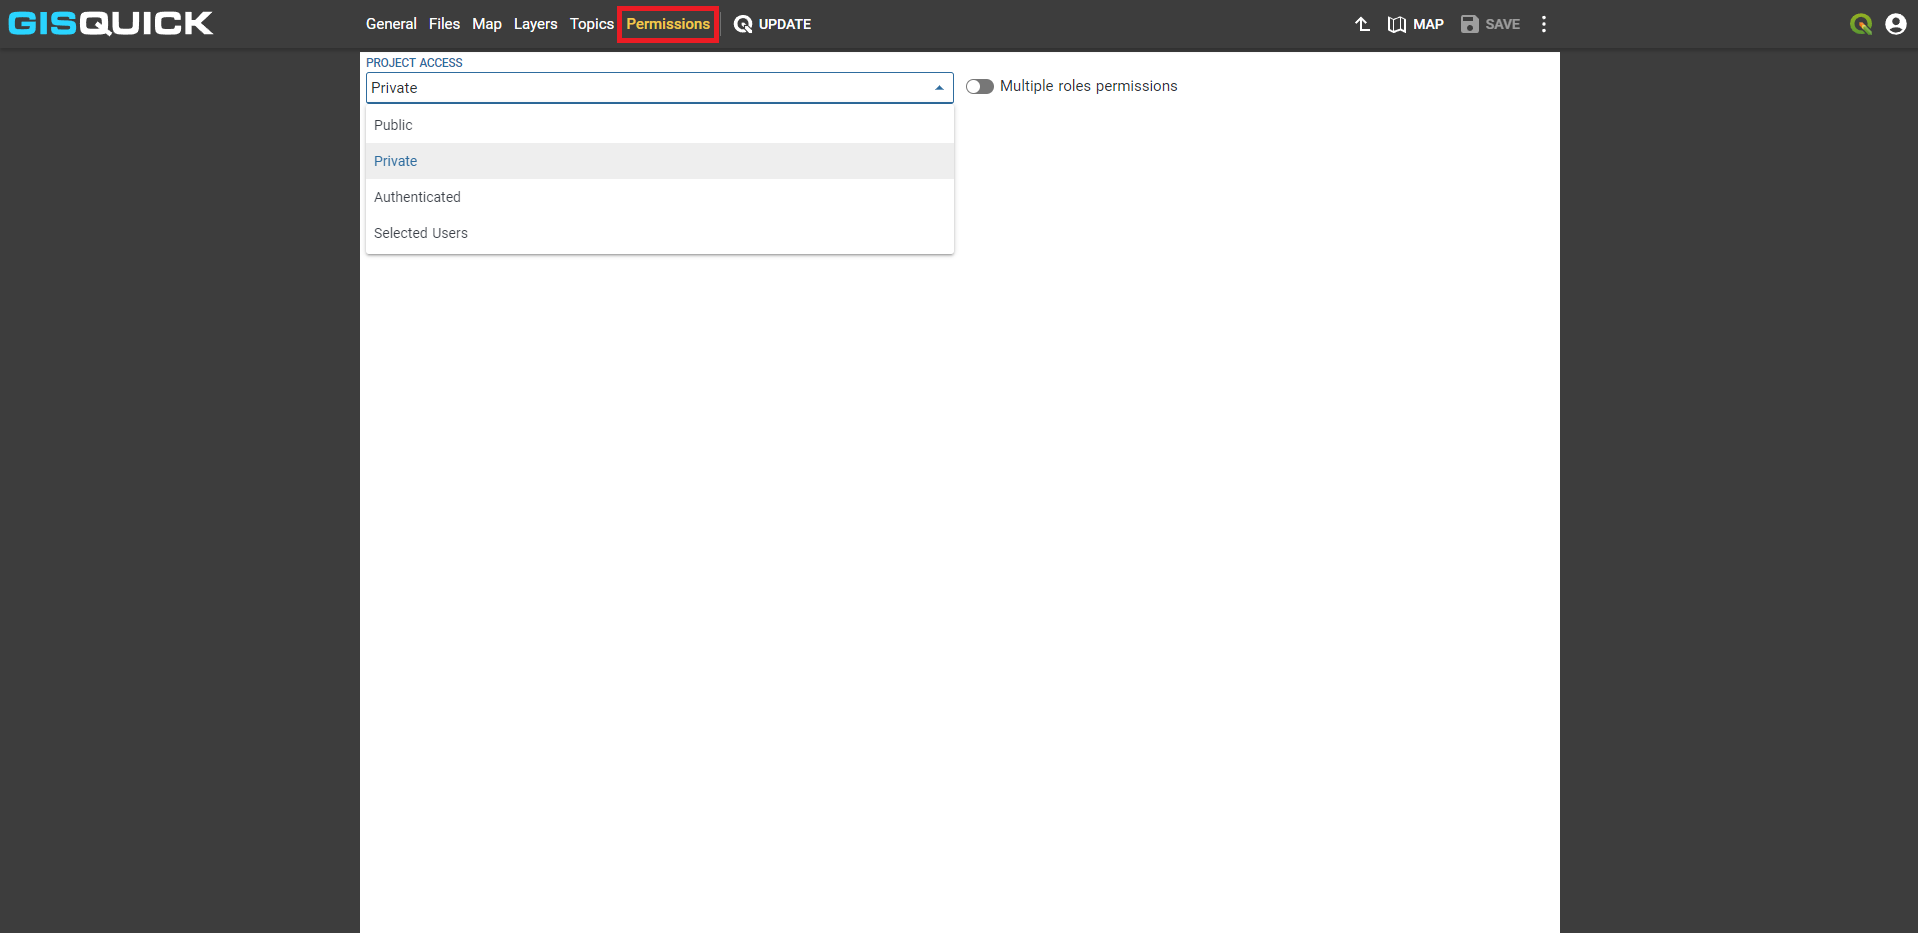
Permissions
The Permissions section defines who has access to the published project. The default setting is that the project is Private. The Permissions can be:
Public - web map is public and everyone, with or without a Gisquick account, can see it online and interact with it.
Private - only the author of the project has access to it.
Authenticated - only users with valid Gisquick account can see the project/web map online and interact with it.
Selected Users - the author gives permissions to project to selected users by filling in their Gisquick usernames.
These four options are the basic Permissions settings. However, there is also an advanced setting that is available by checking the Multiple roles permissions option.
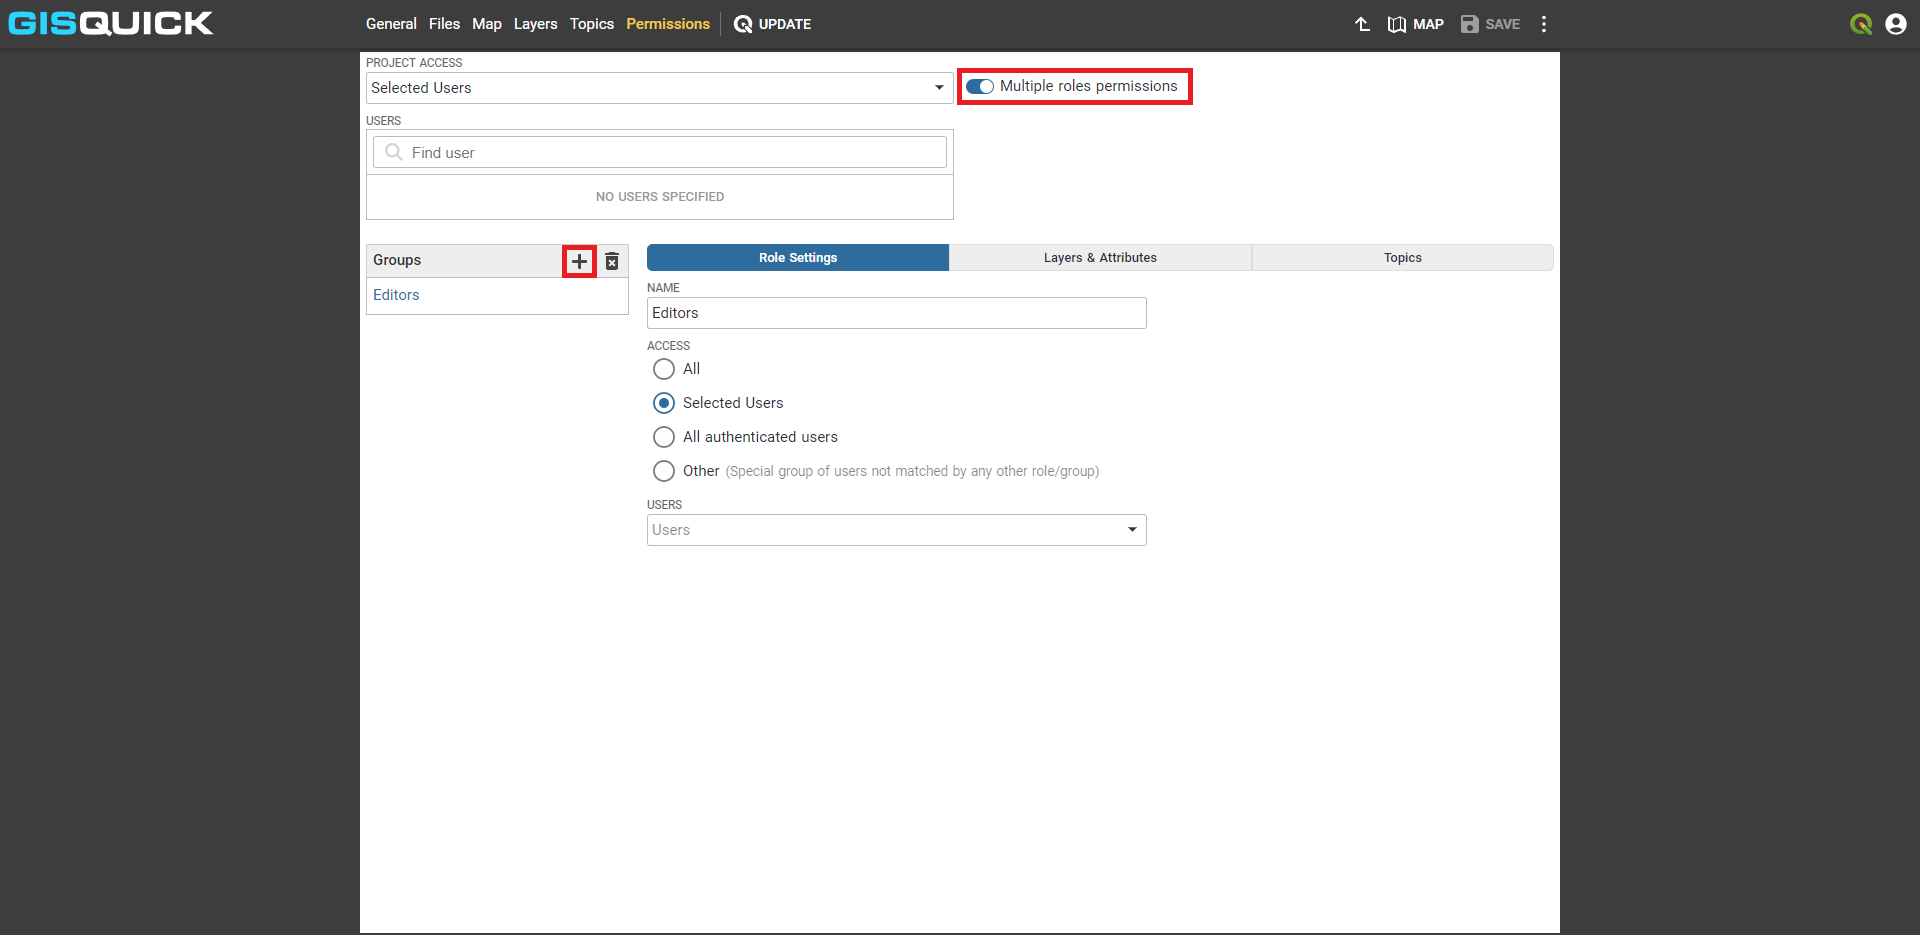
This option allows the user to create one or more Groups of users
that have different access to layers in the project and can see the resulting web map differently.
The group must be created by clicking on the plus icon  and then
the user can set different settings (Role Settings, Layers & Attributes, Topics) for the group.
and then
the user can set different settings (Role Settings, Layers & Attributes, Topics) for the group.
Update
Gisquick allows user to easily edit published projects using QGIS plugin; every change made in project in QGIS can be reflected in Gisquick by activating plugin which enables the user to compare local and cloud project’s folders, layer by layer.
There are two operations, PUSH and PULL where Push updates
the project on the Gisquick server and reflects changes made locally in QGIS into the project
uploaded to Gisquick server,
and Pull updates changes made on Gisquick server into local device.
The user chooses which operation to perform by clicking on the PUSH/PULL button
located in the top-right corner.
In order to Push the change, the user must check the Update QGIS project check-box.
The Files tab gives an overview of which files are affected by the change, and the user
can choose to update all or only some of them (files affected are distinguished by color).
The operation is performed by the PUSH CHANGES button.
Similarly, in the case of a Pull operation, the Update files check-box must be checked.
Other features
Last but not least, other general settings should be mentioned.
Clicking on the  button in top-right corner, next to
 SAVE button,
offers these options:
Download project as a .zip file
Get a link to WMS service that was created with the project
Reset project settings
Delete project from Gisquick server
